

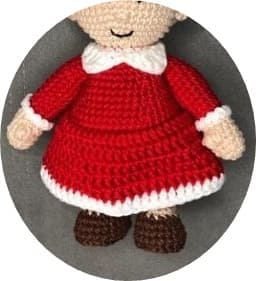
I shared the Christmas amigurumi crochet doll for Mama Claus, who loves children very much and makes sweets and tells them stories. The free amigurumi doll pattern is a little detailed. It’s easy to do step by step. By working carefully, you will have an amigurumi Mama Claus doll like in the photo. I really liked the colors of the beautiful amigurumi doll toy pattern. If you want to make it for Christmas, I recommend choosing the same colors.
We will crochet every detail of the free christmas crochet amigurumi doll free pattern step by step. First we will crochet the legs and torso. After completing the arms and head, most of the doll will be complete. Continue decorating the amigurumi doll by making small crochet details. Finish with cherry and leaf details in your hair. It will be the best gift at your Christmas party and the most eye-catching accessory in your home. Merry Christmas!
Happy Mrs. Claus Crochet Amigurumi Doll Free Pattern
Designer: ellens_workshop
Materials
Yarn in color: Red, brown, white, green, skin color, black yarn for details
Compatible hook (I used a 2,5mm hook 4/0)
Tapestry needle
Fyber filling
Wire if you wish to insert in arms
Scissors
Size: My Mama Claus is 18cm (about 7 inches) tall, from feet to bun
Difficulty: Mama Claus can be crocheted by beginners
Stitches
MR- magic ring
sc- single crochet
slst- Slip Stitch
inc- increase
dec- decrease
bst- bubble stitch (5dc finished together)
BSPC- back post single crochet
hdc- half double crochet
dc- double crochet
tc- treble crochet
dtr- double treble crochet
dc inc- 2dc in the same stitch
picot- chain 2, 1slst in the first ot the two chains
2hdcT- 2hdc closed together
Arms
Skin color
1. 6sc in MR (6)
2. 6inc (12)
3-4. 12sc (12) (2 rows)
5. 5sc, 1bst, 6sc (12)
6. 12sc (12)
Change to white
7. 12sc (12)
Change to red
8. BLO: 12sc (12)
9-10. 12sc (12) (2 rows)
11. (3sc, 1inc) x3 (15)
12-15. 15sc (15) (4 rows)
16. (3sc, 1dec)x3 (12)
17-18. 12sc (12) (2 rows)
fasten off with invisible finish. If you wish to insert wire in the arms, insert just a little bit of fyber filling.
Legs
Brown
To make the legs, we will leave a long yarn in the beginning of the work.
1. chain 5, 3sc, 3sc in the same stitch, 2sc, 1inc (10)
2. 1inc, 2sc, 3inc, 2sc, 2inc (16)
3. 1sc, 1inc, 2sc, (1sc, 1inc)x3, 2sc, (1sc, 1inc)x2 (22)
4. 22 BSPC (22)
5-7. 22sc (22) (3rows)
Change to skin color
8. 5sc, 2dec, 1sc, 2dec, 8sc (18)
9. 5sc, 1dec, 1sc, 1dec, 8sc (16)
10. 4sc, 2dec, 8sc (14)
11-13. 14sc (14) (3 rows)
14. 1sc, (2sc, 1inc)x4, 1sc (18)
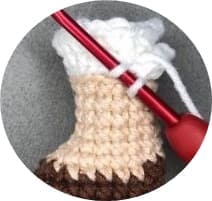
Change to white
15. BLO: 18 loose slst (18)
16. On the BLO of the slst: 18sc (18)
17. 1sc, (3sc, 1inc)x4, 1sc (22)
On the first leg, fasten off. On the second leg continue crocheting to the body. Before crocheting the body, make the white details on the arms and legs.
Arms: In the loops left on row 8, attach a new white yarn and (chain 1, 1slst) to the end.
legs: In the visible white loops on row 15, attach a new white yarn and (chain 1, 1slst) to the end.
Body
From 2nd leg
18. 2sc on the 2nd leg, 22sc on the 1st leg, 20sc on the 2nd leg (44)
19. (10sc, 1inc)x4 (48)
20. 48sc (48)
21. (11sc, 1inc)x4 (52)
22. 52sc (52)
23. (11sc, 1dec)x4 (48)
Change to red
24. 48sc (48)
25. BLO: 48sc (48)
26. (10sc, 1dec)x4 (44)
27. 44sc (44)
28. (9sc, 1dec)x4 (40)
29-30. 40sc (40) (2 rows)
31. (8sc, 1dec)x4 (36)
Now are will join the arms to the body. pay attention so the arms are in the sides of the body with the thumbs (bobble stitch) pointing forward. It may be necessary to make some adjustments in the quantities of stitches so the arms are in the sides of the body. I made my this way:
32. 8sc on the body, 6sc joining a stitch of the arm to a stitch of the body, 12sc on the body, 6sc joining a stitch of the arm to a stitch of the body, 4sc on the body (36)
33. 8sc on the body, 6sc on the rest of the stitches of the arm, 12sc on the body, 6sc on the rest of the stitches of the arm, 4sc on the body (36)
If you want to insert wire in the arms, now is a good time to do so.
34. (4sc, 1dec)x6 (30)
35. (3sc, 1dec)x6 (24)
36. (2sc, 1dec)x6 (18)
So we can make the dress collar, we will make a row in BLO to work on the front loops afterwards. With skin color yarn, we make:
37. BLO: (1sc, 1inc, 1sc)x6 (24)
38. (3sc, 1inc)x6 (30)
39. (2sc, 1inc, 2sc)x6 (36)
40. (5sc, 1inc)x6 (42)
41. (3sc, 1inc, 3sc)x6 (48)
42-51. 48sc (48) (10 rows)
52. (3sc, 1dec, 3sc)x6 (42)
53. (5sc, 1dec)x6 (36)
54. (2sc, 1dec, 2sc)x6 (30)
55. (3sc, 1dec)x6 (24)
56. (1sc, 1dec, 1sc)x6 (18)
57. (1sc, 1dec)x6 (12)
58. 6 dec (6)
Finish with an inverted magic ring.
Collar
White
Attach white yarn on the loops left on row 38, in the middle of the back part on neck
1. (1sc, 1inc)x9 (27)
2. 5slst, 2sc, 1hdc, 1dc, 1tc, 2dtr on the same stitch, 1dc, 1hdc, 1slst*, 1hdc, 1dc, 2dtr on the same stitch, 1tc, 1dc, 1hdc, 2sc, 5slst (27)
*The slst must be in the center of the front of the neck. Finish off and hide the yarn. I glued the collar on place so it would stay in position.
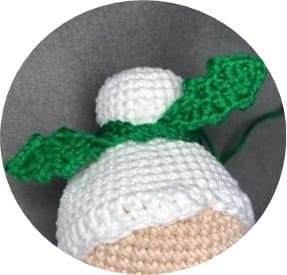
Hair
White
1. 6sc on MR (6)
2. 6inc (12)
3. (1sc, 1inc)x6 (18)
4. (1sc, 1inc 1sc)x6 (24)
5. (3sc, 1inc)x6 (30)
6. (2sc, 1inc, 2sc)x6 (36)
7. (5sc, 1inc)x6 (42)
8. (3sc, 1inc, 3sc)x6 (48)
9-14. 48sc (48) (6 rows)
15. 23dc, 1hdc, 1slst, 1hdc, 22dc, 1slst on the first stitch of the row (48)
Finish off. Leave a long yarn for sewing. If you prefer, you can cut the yarn and glue the hair on the head.
Bun
White
1. 6sc on MR (6)
2. 6inc (12)
3. (1sc, 1inc)x6 (18)
4. (1sc, 1inc, 1sc)x6 (24)
5. (3sc, 1inc)x6 (30)
6. 30sc (30) (4rows)
7. (3sc, 1dec)x6 (24)
Finish off and leave a yarn to sew on the top of the head, on the hair. You can sew it in the position you prefer. Here are some options:
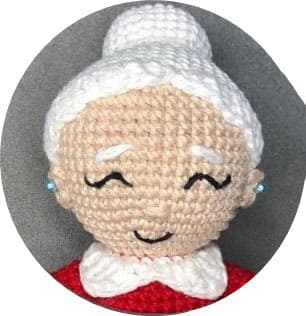
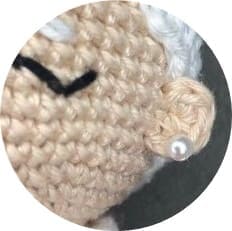
Ears
Skin color
Make two
1. 5hdc and 1slst o MR (5)
Finish off and leave yarn for sewing between. Sew between rows 7 and 8 of the head. After sewing, I glued it with a little glue so the ears wouldn’t stick out.
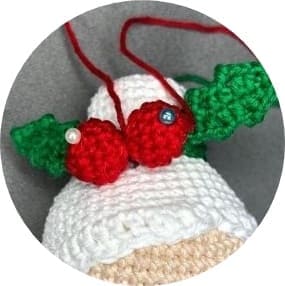
Holly Berries
Red
Make two
1. 6sc on MR (6)
2. 6inc (12)
3-4. 12sc (12) (2 rows)
5. 6dec (6)
Finish off with inverted MR and leave yarn for sewing
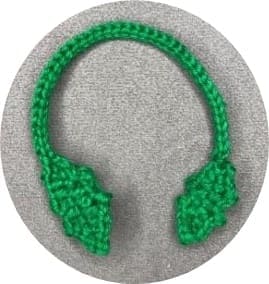
Holly Leaf
Green
To make de leaves, I used a smaller crochet hook:
Chain 9, 1sc, (2hdc, 1picot)x2, 2hdc, on the last chain: (1sc, 1picot, 1sc). On the other side of the chains: (2hdc, 1picot)x2, 2hdc, 1sc
Finish off and hide the ends on the first leaf. We make the second leaf same way we made the first leaf, then we chain 40, slst on the beginning of the first leaf, return by making slst on the 40 chains and finish with a slst on the second leaf. You can leave a yarn for sewing or cut it and glue it to the head.
Detail Assembly
With the green part I made a knot around the bun and glued with a little glue.
I glue the berries on the knot in green
Nose
Skin color
I embroided the nose 2 stitches wide, between rows 6 and 7 of the head.
Drees
Red
The dress will be made by attaching a new red yarn of the loops left on row 25 of the body, with the dolls head turned to you.
We will work in circular crochet, so in the beginning of each row we chain 2 and in the end we slst in the first stitch of the row.
1. (11dc, 1dc inc)x4 (52)
2-5. 52dc (52) (4 rows)
Change to white
6. 52dc (52)
Finish off with invisible finish and hide the yarn.
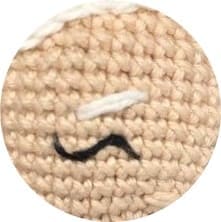
Mouth
Black embroidery yarn
With the same yarn I made the eyes, I made the mouth 3 stitches wide.
Eyes
Black embroidery yarn
To start the eyes, exit with the black yarn up 2 stitches and 1 stitch away from de nose. Insert the needle 3 stitches to the side. Secure de middle of the yarn one row up, to make it look like closed eyes. Then we will make the eyelashes by exiting one stitch up and to the side from the end of the eyes.

Eyebrows
White
The eyebrows were embroided with as wide as the eyes, without considering the eyelashes. We will align the beginning of the eyebrown to the beginning of the eye, and the end of the eyebrow to eh end of the eye, but make it diagonaly, going down one row.
Earring
You can glue or stitch a head to the ear to look like earrings
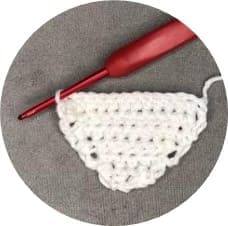
Apron
White
We will work in roes to make a flat piece, so we will turn the work in the end of each row.
1. chain 15, 13hdc (13)
2. chain 2, 2hdcT, 9hdc, 2hdcT (11)
3. chain 2, 2hdcT, 7hdc, 2hdcT (9)
4. chain 2, 2hdcT, 5hdc, 2hdcT (7)
5. chain 2, 2hdcT, 3hdc, 2hdcT (5)
6. chain 2, 2hdcT, 1hdc, 2hdcT (3)
Fasten off. It will look like this:
So we can finish the apron, we will attach the new yarn in the corner of the piece and make the apron frill. To make it we will work on the side of the apron. The side of the work don’t have clear stitches to work on, so you will have to see the image of the apron and decide were to insert the hook.
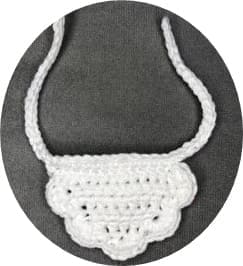
To make one frill, we make: Skip a space, make 5hdc in the same place, skip a space, slst
I made 2 frills on each side and one on the bottom of the apron. Don’t cut the yarn.
After Finishing the frills, we will make the straps to tie the apron on Mama’s waist. To do so, we chains 31, make 30slst on the chains, 13sc on the initial chains, chain 31, make 30 lslt on the chains. Finish off, hide the ends. Tie it to the back of Mama Santa. If you wish, you can glue it so ir doesn’t move.

Leave a Comment