
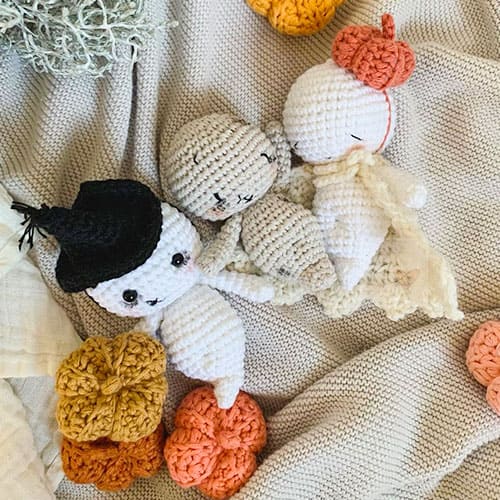
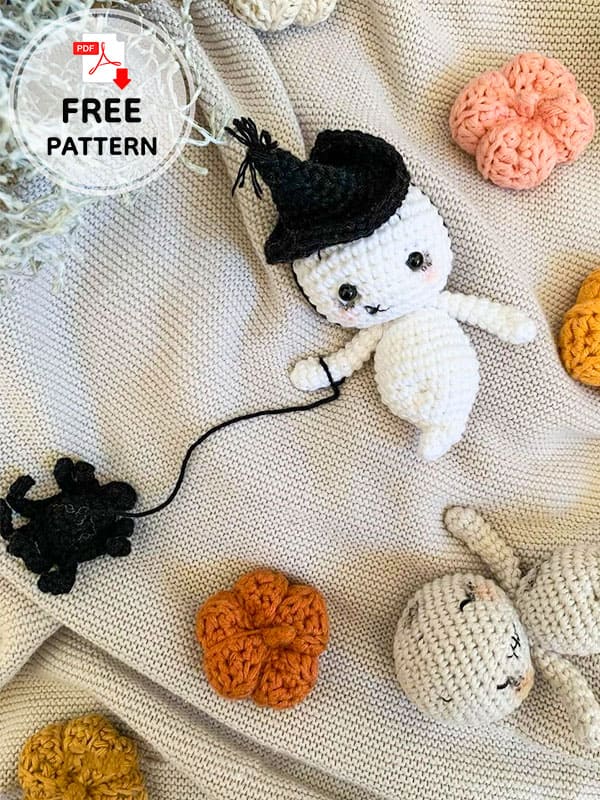
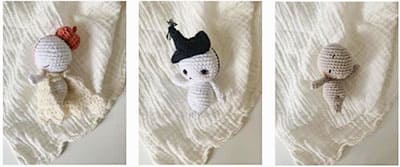
There are only a few days left until Halloween. We are now intensifying our preparations. I wanted to surprise you today and brought you a free crochet ghost pattern. It looks very tiny and quite cute. The cute crochet ghost has two different hats. Witch hat and pumpkin hat. You will learn how to make both hats. You will quickly complete the cute crochet ghost pattern thanks to its detailed step by step and helpful pictures. Being a beginner doesn’t change this. Because amigurumi pattern is the basic level. So let’s complete the little crochet ghost.
Free Crochet Ghost Pattern
Designer: ninastime
Abbreviations
MR: Magic ring
Sc: Single crochet
Slst: Slip stitch
Ch: Chain
Ch-sp: Chain space
Sts: Stitches
Inc: Increase
Dec: Decrease
Hdc: Half double crochet
Hdc-inc: Half double crochet increase
Hdc-dec: Half double crochet decrease
Dc: Double crochet
Tch: Turning chain
Rd: Round
Skip: Skip one stitch
FLO: Front loop only
BLO: Back loop only
Materials and tools
Crocheted with cotton yarn babytoly organic cotton (50g,105m) or ricorumi (25g,57.5m):
approx 20 grams of white yarn for the ghost.
and approx. 10 grams of the same weight or a thinner yarn (cotton or alpaca) for the cape.
approx. 5 grams for witch hat and pumpkin in an additional color.
crochet hook size 2.5 for the ghost, hat and pumpkin and 3.0 for the cape.
thin black yarn for embroider the face.
maybe a pair of safety eyes (5 mm) (or 8 mm if you crochet with chenille).
tapestry needle.
fiberfill.
scissors.
The finished doll is about 11 cm.
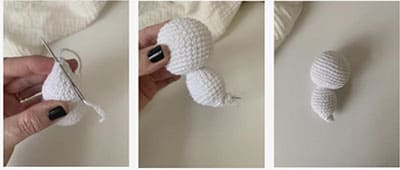
Start with the head in your base color, here white. The body is crocheted seamlessly.
Head
1. 6 sc in MR (6)
2. (inc)x6 (12)
3. (1sc,inc)x6 (18)
4. (1sc,inc)x9 (27)
5. 27 sc (27)
6. (8sc,inc)x3 (30)
7. (4sc,inc)x6 (36)
8-13. 6 rd 36 sc (36)
If you choose safety eyes, insert them at rd 11 with a distance of approx. 7 st to each other.
14. (4sc,dec)x6 (30)
15. 30 sc (30)
16. (1sc,dec)x10 (20)
The head is continuously filled.
Make sure that you stuff stuff in the cheek and chin area so that head shape looks particulary cute.
17. (dec)x10 (10)
Do not cut the yarn.
Continue crocheting the body seamlessly with your white yarn.
Body
1. 10 sc FLO (10)
2. (inc)x10 (20)
3-5. 3 rd 20 sc (20)
6. (3sc,inc)x5 (25)
7-9. 3 rd 25 sc (25)
10. (3sc,dec)x5 (20)
11. (3sc,dec)x4 (16)
Stuff the body while crocheting.
Especially the neck area is well stuffed with fiberfill so that the head does not wobble.
The head will lean a bit forward, if you stuff the back neck area well.
12. (6sc,dec)x2 (14)
13. (5sc,dec)x2 (12)
Stuff a bit more, but it the end only a bit fiberfill.
14. (4sc,dec)2x (10)
15. 10 sc (10)
16. (3sc,dec)x2 (8)
17. (2sc,dec)x2 (6)
Close the opening, fasten off, pull the thread to a stitch at the tip and sew in end at the back.
The tip bulges a bit forward.
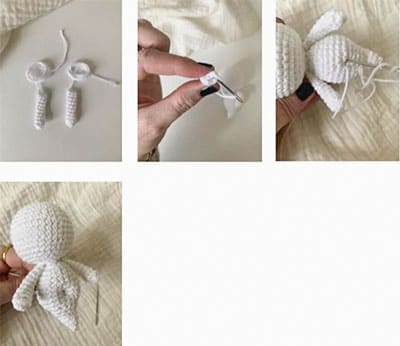
Arms
Crochet two in your base color, here white. The arms are not filled.
1. 7 sc in MR (7)
2-10. 9 rd 7 sc (7)
Leave a long tail for sewing.
Flatten the opening and sew it together.
The arms sew directly under the head on the left and right of the neck.
Do not cut the yarn. Pull the thread to the middle of the body (to rd 8) and create the belly button (navel). Stitch from the one stitch to the next and bring the thread backwards pulling it tight.
The navel is now arched inwards.
Knot the thread with another thread of the arms, sew it up throughly and let both of them disappear into the body.
Cape
Crochet in your base color, here white.
You can take the same like your base color or choose a thinner cotton yarn or thinner alpaca yarn e.g. Drops nord.
Be careful not to crochet too tight. I recommend using a crochet hook size larger or if your yarn is thinner keep your hook size.
Crochet in rows, the tch isn’t counted.
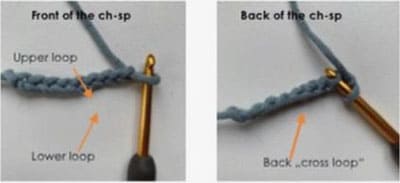
Start with a ch-sp of 19 ch.
1. 18 sc in the back “cross loop”, tch 18
Now go on crocheting hdc in each stitch.
Next rw create the opening for the arms.
2. 3 hdc, 3 ch + skip 1 st, 10 hdc, 3 ch + skip 1 st, 3 hdc (22)
3-8. 6 rows 22 hdc (22)
9. hdc-inc, 20 hdc, hdc-inc (24)
In the last rows the tips are crocheted.
10. [1sc, in the next st: (2 hdc, 1 picot, 2 hdc), 1 sc, 1 slst]
repeat this sequence […] 5 more times.
Cut the yarn and sew in end.
Weave a ribbon through the top cuff and tie the cape.
You can also crochet a ribbon of 55-60 ch.
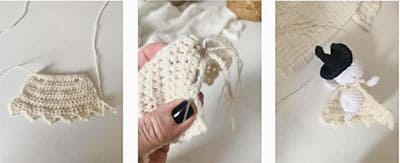
picot: 3 hdc, 3 ch, one slst in the first of the 3 ch.
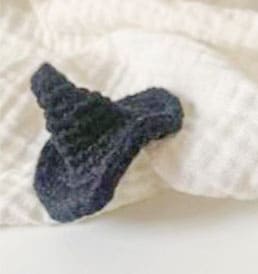
Witch hat
Crochet in your additional color, here black.
1. 6 sc in MR (6)
2. 6 sc (6)
3. (2sc,inc)x2 (8)
4. (1sc,inc)x4 (12)
5. 12 sc (12)
6. (3sc,inc)x3 (15)
7. (4sc,inc)x3 (18)
8. 18 sc (18)
9. (2sc,inc)x6 (24)
10. 24 sc (24)
11. (hdc-inc blo)x24 (48)
12. 48 slst
Leave a long thread (approx. 30 cm) for sewing the hat onto ghost’s head.
You can crumple (squeeze) the hat a little to show off the shape better.
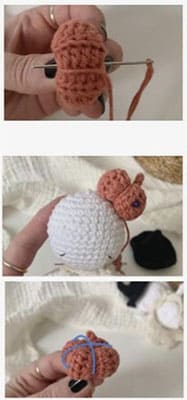
Mini pumpkin
Crochet in your additional color, here orange.
Crochet in rows, the tch isn’t counted.
Start with a ch-sp of 11 ch.
You are crocheting each stitch blo.
1-12. 12 rows 2 sc blo, 6 hdc blo, 2 sc blo, tch (10)
Do not cut the yarn.
Fold the short sides of your rectangle together and crochet the outer loops loosely together with slst.
Now cut the thread (about 1 meter) and turn your pumpkin inside out, so the crocheted seam has become virtually invisible.
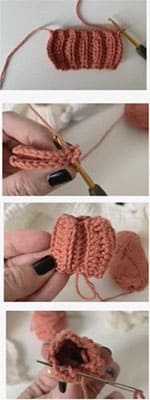
Take your sewing needle and close the first of the two remaining openings.
Weave the thread through the top edge each row.
Bring the thread through the center of the pumpkin to the other opening, to close it in the same way (do not forget to stuff your pumpkin before).
Now create the pretty shape by using the thread like a cross pulling around your pumpkin. Pull the thread very tight.
Pull the thread to the top and make the stem.
Create a loop, crochet 6 ch and 5 slst.Fix the thread, place the pumpkin on ghost’s head and sew it on.
Embroider the face
Embroider each eye with thin black thread. They go over 2 stitches diagonally from rd 11 to 12.
The distance between them at rd 11 is about 5-6 stitches.
If you choose safety eyes you have placed them on at rd 11 with a distance of approx. 7 st. In this variant, dark shadows under the eyes are particularly good. Take a thin black crayon and blend it gently.
Open eyes: Embroider them at rd 11.to 12. The distance to each other is about 7 st.
Embroider the eyebrows at rd 6. to 7.
You can embroider a cute small or a funny-creepy mouth at rd 13.
Take your rouge or a beeswax crayon and apply it on the cheeks area.

Leave a Comment