
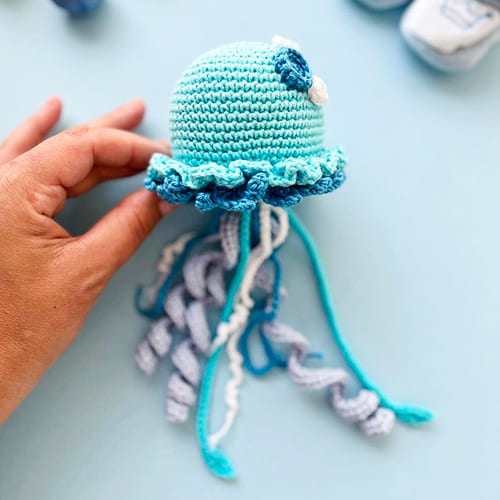

Children love crochet jellyfish amigurumi toys. I will share a wonderful jellyfish pattern for you today. First of all, I would like to express my gratitude to the designer of the amigurumi toy. Thanks to the step-by-step detailed and helpful photos, you can quickly complete the cute crochet jellyfish without difficulty. You can work with threads in the colors you want. You can see a blue jellyfish in the photo, but our designer worked with a pink thread. You can also work with colors and plush yarns according to your imagination. Now I would like to invite you to a free amigurumi pattern instruction. You can continue to follow us for more crochet jellyfish patterns.
Crochet Jellyfish Jelly Amigurumi PDF Free Pattern
Designer: rnata6744
Materials
• 2.5 mm hook
• Cotton yarn
– I used Catania in light pink (246), white (106), cyclamen (114), pink (225) and mauve (399).
• Stuffing
• Yarn needle
• Stitch marker
Abbreviations
Ch: Chain
MR: Magic ring
Sc: Single crochet
Inc: Increase
Dec: Decrease
Dc: Double crochet
Slst: Slip stitch
FO: Fasten off
Body
Use the light pink yarn.
Rnd 1. 6 sc in magic ring (6)
Rnd 2. (inc)x6 (12)
Rnd 3. (inc,sc)x6 (18)
Rnd 4. (2sc,inc)x6 (24)
Rnd 5. (inc,3sc)x6 (30)
Rnd 6. 2sc, (inc,4sc)x5, inc, 2sc (36)
Rnd 7. 4sc, (inc,5sc)x5, inc, sc (42)
Rnd 8. (6sc,inc)x6 (48)
Rnd 9-10. sc around (48) 2 rounds.
Rnd 11. (inc,7sc)x6 (54)
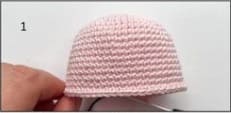
Rnd 12-19. sc around, (fig 1) (54), 8 rounds.
Rnd 20. (dec,7sc)x6 (48)
Rnd 21. (dec,6sc)x6 (42)
Rnd 22. FLO: sc around (42)
Don’t cut the yarn, we are going to make the binding (upper layer).
Use only the front loops of the last round (round 22): (3 dc* in next 3 loops, 3 tr in next 3 loops)x7, (fig 2,3,4) (126)
it means: 3 dc together in one loop and repeat it 3 times.
Fasten off.
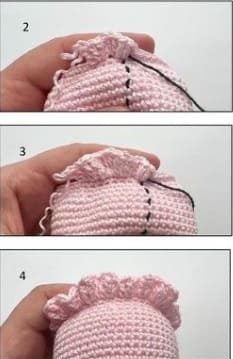
The binding (lower layer)
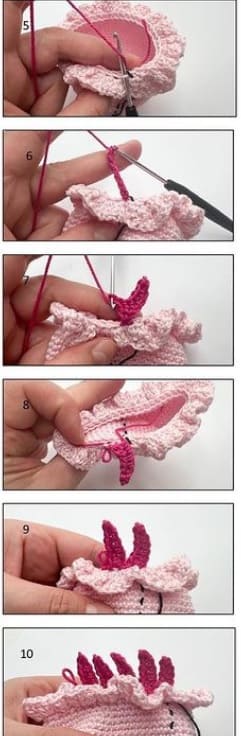
Attach the cyclamen color of yarn to the first back loop of last round (round 22) (fig 5).
Ch 7 (fig 6), start in second chain from hook: 2 sc, 2 hdc, 2 dc, then make a slst in next 2 loops, (fig 7,8). Repeat it 20 times more (fig 9,10).
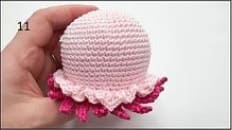
Stuff the body firmly (fig 11).
Bottom part
Use the light pink yarn.
Rnd 1. 6 sc in magic ring (6)
Rnd 2. (inc)x6 (12)
Rnd 3. (inc,sc)x6 (18)
Rnd 4. (2sc,inc)x6 (24)
Rnd 5. (inc,3sc)x6 (30)
Rnd 6. 2sc, (inc,4sc)x5, inc, 2sc (36)
Rnd 7. 4sc, (inc,5sc)x5, inc, sc (42)
Rnd 8. sc around (42)
Tentacles (first type)
Use the pink yarn.
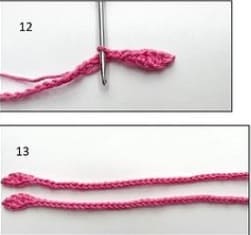
Ch 45. Start in second chain from hook: sc, hdc, dc, hdc, sc (fig 12), slst in next 39 st (44).
Cut the yarn, leave a tail for sewing (fig 13).
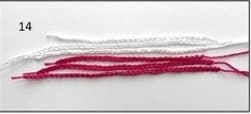
Tentacles (second type, make 6)
Use the white and cyclamen yarn.
White color: Ch 30, ch 35 and ch 40.
Cut the yarn, leave a tail for sewing.
Cyclamen color: Ch 30, ch 35 and ch 40.
Cut the yarn, leave a tail for sewing (fig 14).
Tentacles (third type, make 3)
Use the mauve yarn.
Ch 45. Start in second chain from hook: 3 hdc in each chain stitch (132)
Cut the yarn, leave a tail for sewing.
Use the hook, attach the tentacles third type through the magic ring of the bottom part. Insert the hook from the wrong side to outside, pick up the tails and pull it through (fig 17,18,19).
Secure the tails on the wrong side by going across the loops using the needle as show on photo (fig 20). Then make 2 knots (fig 21).
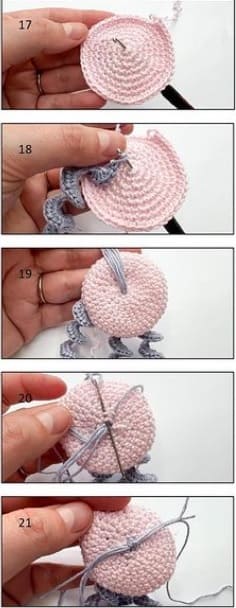
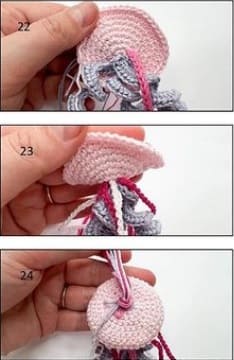
Attach the tentacles first and second types between rounds 1 and 2 (fig 22,23,24).
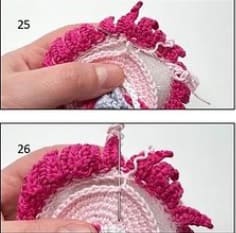
Sew the bottom part to the back loops round 21 of the body (fig 25,26,27).

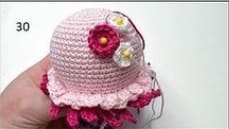
At last, sew the spots on the body (fig 30).
Find the pattern of spots in the pattern of whale.

Leave a Comment