

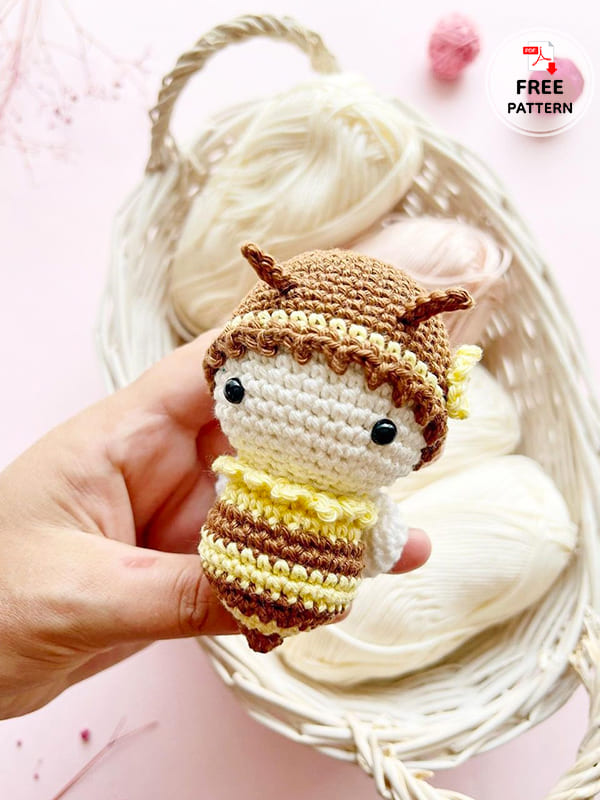
After a short break, I brought you a new amigurumi pattern, my beauties. Our free pattern for today is the crochet bee. Since it is small, you can use it as a keychain if you wish. Seeing a cute crochet bee toy next to your keys or in your bag will give you a good energy during the day. In addition, if you wish, you can present this handmade bee to your friends and make them smile. Just take a look at the required materials list and get to work. You can easily complete the cute little crochet bee toy thanks to the helpful pictures that will allow you to follow step by step.
Little Crochet Bee Keychain Amigurumi Free Pattern
Designer: rnata6744
Abbreviations
Ch- Chain
Sc- Single crochet
Inc- Increase
Dec- Decrease
Hdc- Half double crochet
Dc- Double crochet
Slst- Slip stitch
Materials and tools
• 2.5 mm crochet hook
• Cotton yarn
• 2.5 mm hook
I used schachenmayr catania “originals” in cream (130), light brown (257), brown (157), yellow (403).
• Safety eyes 6.00 mm
• Stuffing
• Yarn needle
• Stitch marker
Head
Use the cream yarn.
1. Start 6 sc in magic ring (6)
2. (inc)x6 (12)
3. (inc,sc)x6 (18)
4. (2sc,inc)x6 (24)
5. (inc,3sc)x6 (30)
6. 2sc, (inc,4sc)x5, inc, 2sc (fig 1) (36)

7. sc around (36)
8. (8sc,inc)x4 (40)
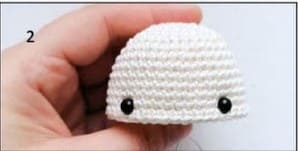
9-15. sc around (40), 7 rounds.
Attach the safety eyes between rounds 13 and 14 with 9 stitches between (fig 2).
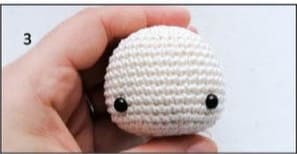
16. (dec,3sc)x8 (32)
17. (dec,2sc)x8 (24)
18. (dec,sc)x8 (16)
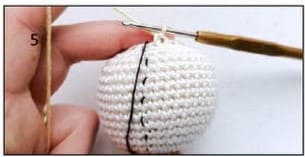
Stuff the head firmly (fig 3).
Change the yarn to yellow.
Tip: When the pattern indicates to make the color change, it’s really important to remember that the change must always be started one stitch earlier.
The first stitch of round 19 should be yellow color.
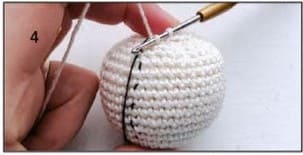
How to change color of yarn:
With the two loops from the previous yarn on the hook (fig 4), wrap the new yarn around the hook, then pull the new yarn through the two loops of the stitch (fig 5).
Cut the cream yarn.
Body
Use the yellow yarn.
19. sc around (16)
20. BLO: (sc,inc)x8 (24)
21. sc around (24)
Change the yarn to brown and don’t cut the yellow yarn.
22. (3sc,inc)x6 (30)
23. sc around, (fig 6) (30)
Change the yarn to yellow.
24-25. sc around (30), 2 rounds.
26. sc around (30)
27. (dec,3sc)x6 (24)
Change the yarn to yellow.
28. sc around (24)
29. (dec,sc)x8 (16)
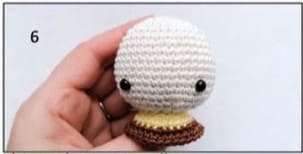
Start to stuff the neck and the body firmly (fig 7).
Change the yarn to brown.
30. (dec)x8 (8)
31. sc around (8)
Cut the yarn, leave a tail for closing.
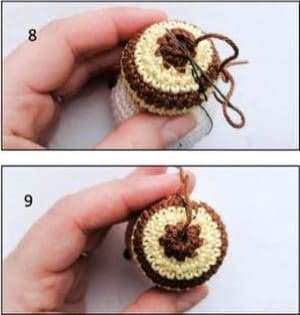
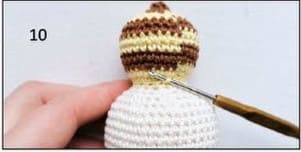
How to close the end of round: with a darling needle, insert the remaining yarn through all the front loops of the stitches (fig 8,9) on the last round. Pull all together at once and hide the yarn inside of the body.
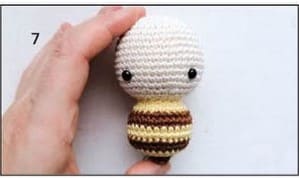
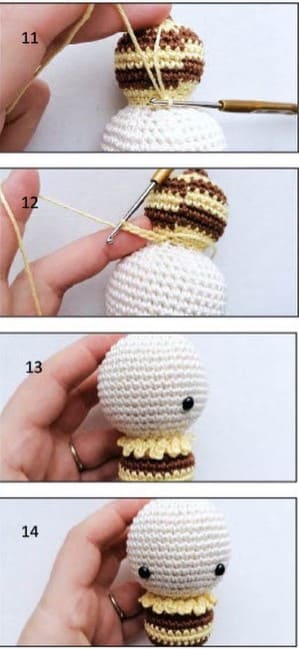
Lay the body so that the bottom is at the top and away from your face. Then, insert your hook in the last front loop of round 20 (fig 10). Pick up the yellow yarn and pull it through (fig 11). Ch 5, then make a slst in next loop. Repeat (ch 5, slst in next loop) 20 times (fig 12,13 and 14).
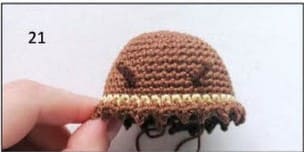
Cap
Use the brown yarn.
1. Start 6 sc in magic ring (6)
2. (inc)x6 (12)
3. (inc,sc)x6 (18)
4. (2sc,inc)x6 (24)
5. (inc,3sc)x6 (30)
6. 2sc,(inc,4sc)x5, inc, 2sc (36)
7. sc around (36)
8. (8sc,inc)x4 (40)
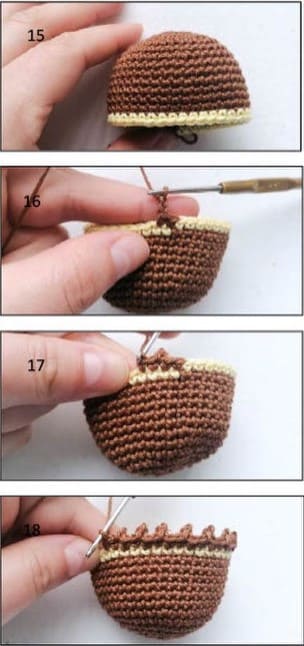
9-14. sc around (40), 6 rounds.
Change the yarn to yellow.
15. sc around, (fig 15) (40)
Change the yarn to brown and cut the yellow yarn.
16. sc in next 2st (fig 16), ch 2, start in second chain from hook: slst in next chain stitch (fig 17). Repeat 20 times (fig 18).
Fasten off.
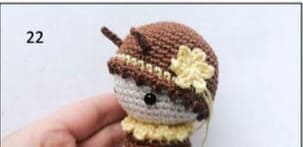
Antennes (make 2)
Use the brown yarn.
Ch 5. Start in second chain from hook: slst in the next 4 ch stitches.
Cut the yarn, leave a tail for sewing.
Flower
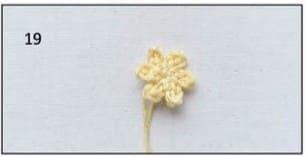
Use the yellow yarn.
In the magic ring (ch 5, slst)x6
Tİghten the thread well. Cut the yarn, leave a tail for sewing (fig 19).
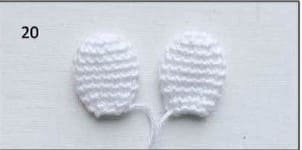
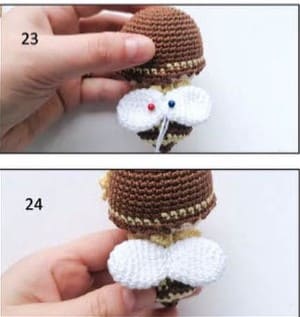
Wings (make 2)
Use the white yarn.
1. Start 6 sc in a magic ring (6)
2. (inc)x6 (12)
3. (3sc,inc)x3 (15)
4-7. sc around (15), 4 rounds.
8. (dec,3sc)x3 (12)
9. (dec,2sc)x3 (9)
Cut the yarn, leave a long tail for sewing.
Don’t stuff the wings.
Assemble
Sew the antennas to the cap between rounds 12 and 13 with 5 stitches between (fig 21).
Sew the flower on the right or on the left from the antennas (fig 22).
At last, sew the wings to the body (fig 23,24).

Leave a Comment