
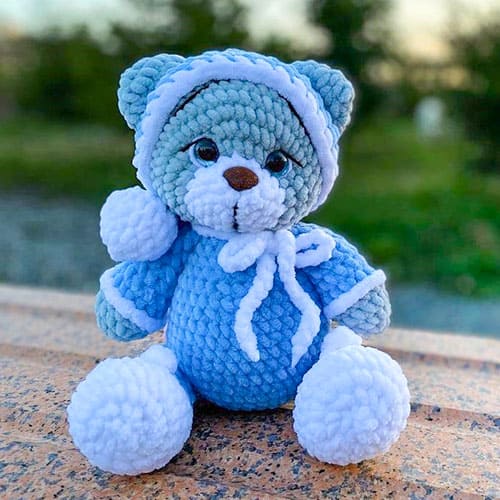
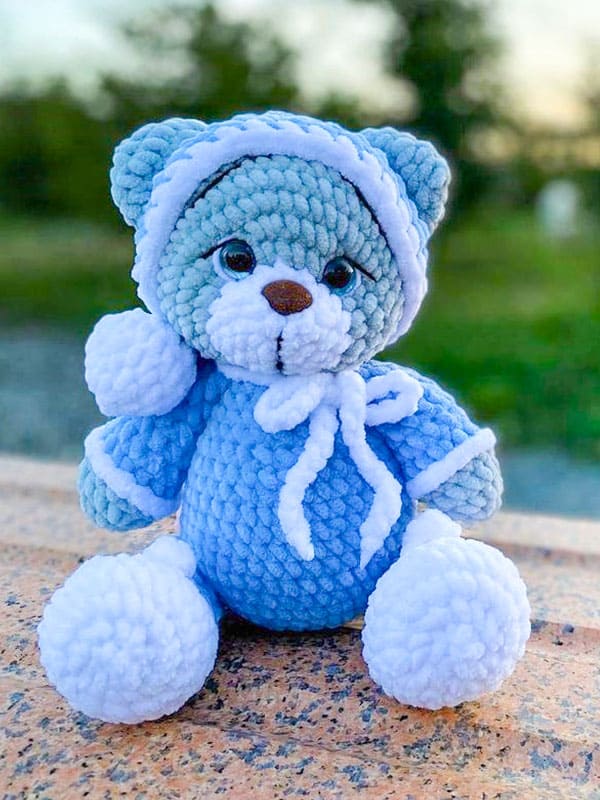
I continue today with the free crochet teddy bear pattern, friends. The crocheted teddy bear in the blue pajamas looks pretty cute, doesn’t it? She looks very cute with her white bunny booties and a crochet hat with a pompom on her head. Our designer used a plush yarn while embroidering the cute teddy bear and I recommend you to use this yarn. It will be in a larger size, and since its texture will be soft, it can be a sleeping companion for your children. It will be sufficient to use a 4 mm crochet hook when embroidering the crochet teddy bear. I did not write the assembly part in the free pattern, but you can assemble your teddy bear by watching the designer’s youtube channel. Take a look at the list of required materials right now and make up for your shortcomings. Then follow the step-by-step amigurumi pattern instructions to complete the cute crochet teddy bear. I wish you a happy week.
Free crochet teddy bear in pajamas pattern
Designer: rosalie_toys
Abbreviations
MR: Magic ring
Ch: Chain
Slst: Slip stitch
Sc: Single crochet
Dec: Decrease
Inc: Increase
Hdc: Half double crochet
Materials and tools
Plush yarn
14/18 mm safety nose
14 mm safety eyes
4 mm crochet hook
Joints
A yarn needle
Scissors
Holofiber
First of all, we start the construction of the teddy bear with its legs. There are white crochet bunny booties on the feet.
Legs
Rnd 1. 6 sc in a MR
Rnd 2. 6 inc (12)
Rnd 3. 12 inc (24)
Rnd 4-6. 24 sc (3 row)
Rnd 7. 6 sc, 6 dec, 6 sc (18)
Rnd 8. 5 sc, 4 dec, 5 sc (14)
Rnd 9. 6 sc, 4 ch, from the second chain stitch from the hook 4 hdc, 1 slst, 1 sc, 4 ch, from the second chain stitch from the hook 4 hdc, 6 sc (13)
Color changes in the last stitch 9th row.
Rnd 10. 13 sc
Stitch 6 and 8 are done under the ears of the bootee.
Rnd 11-15. 13 sc (5 rows)
You can start stuffing from the 12th row.
Rnd 16. dec, 5 sc, dec, 6 sc
To stuff as needed the leg.
Between the 6th and 7th round, insert the joint.
Rnd 17. 5 dec
Close the hole.
After carefully crocheting the legs, we can move on to the next step arms.
Arms
Rnd 1. 6 sc in a MR
Rnd 2. 6 inc (12)
Rnd 3. (5sc,inc)*2 (14)
Rnd 4. 14 sc
Color changes in the last stitch 4th row.
Rnd 5. dec, 6 sc, inc, 5 sc (14)
Rnd 6. 6 sc, dec, 5 sc, dec (12)
Rnd 7. 12 sc
Rnd 8. 5 sc, dec, 4 sc, dec (10)
Rnd 9. 4 sc, dec, 4 sc (9)
Rnd 10-11. 9 sc (2 rows)
Fold in half and crochet 4 sc through both sides.
Ears
Rnd 1. 6 sc in a MR
Rnd 2. 6 inc (12)
Rnd 3. (1sc,inc)*6 (18)
Rnd 4. 18 sc
Rnd 5. dec, 8 sc, dec, slst
Cut the yarn, leaving a tail for sewing.
Tail
Rnd 1. 6 sc in a MR
Rnd 2. 6 inc (12)
Rnd 25. 31 sc, 2 slst.
Cut the yarn, leaving a tail for sewing.
A scarf: 70 ch st.
Body
Rnd 1. 6 sc in a MR
Rnd 2. 6 inc (12)
Rnd 3. (1sc,inc)*6 (18)
Rnd 4. (2sc,inc)*6 (24)
Rnd 5. (3sc,inc)*6 (30)
Rnd 6. (4sc,inc)*6 (36)
Rnd 7. (11sc,inc)*3 (39)
Rnd 8-12. 39 sc (5 rows)
Place the legs between the 6th and 7th rounds.
Rnd 13. (11sc,dec)*3 (36)
Rnd 14. 36 sc
Rnd 15. (4sc,dec)*6 (30)
Rnd 16. 4 sc, dec, (3sc,dec)*5 (24)
Rnd 17. 24 sc
Rnd 18. 3 sc, dec, (2sc,dec)*5 (18)
Beginning to stuff.
Rnd 19. 8 sc, dec, 7 sc, dec (16)
Rnd 20. 3 sc, 4 sc, (with arm), 5 sc, 4 sc (with arm), 1 slst.
Finish stuffing.
Cut the yarn, leaving a tail for attaching the head.
Now that we’ve finished her body, we can start crocheting the head.
Head
Rnd 1. 6 sc in a MR
Rnd 2. 6 inc (12)
Rnd 3. (1sc,inc)*6 (18)
Rnd 4. 18 sc (color changes in the last stitch 4th row).
Rnd 5. 2 sc, 14 inc, 2 sc (32)
Rnd 6. 5 sc, (2sc,inc)*7, 7 sc (39)
Rnd 7. 8 sc, (5sc,inc)*3, 13 sc (42)
Rnd 8-12. 42 sc (5 rows)
Nose, between the 2 and 3 rounds.
Eyes, between round 5 and 6.
And about 7 stitches apart.
Rnd 13. (12sc,dec)*3 (39)
Rnd 14. 12 sc, dec, (11sc,dec)*2 (36)
Rnd 15. 5 sc, dec, (4sc,dec)*5 (30)
Rnd 16. 4 sc, dec, (3sc,dec)*5 (24)
Rnd 17. 3 sc, dec, (2sc,dec)*5 (18)
Rnd 18. 2 sc, dec, (1sc,dec)*5 (12)
Rnd 19. 1sc, 5 dec
Close the hole.
As the last step, we will make the teddy bear’s hat. We start by making pompoms.
Hat
The pompom.
Rnd 1. 6 sc in MR
Rnd 2. 6 inc (12)
Rnd 3. (1sc,inc)*6 (18)
Rnd 4. 18 sc
Rnd 5. (1sc,dec)*6 (12)
Rnd 6. 4 dec
Attach the blue yarn to pompom.
Rnd 1. 4 sc
Rnd 2. (1sc,inc)*2 (6)
Rnd 3. 6 sc
Rnd 4. (1sc,inc)*3 (9)
Rnd 5. 9 sc
Rnd 6. (2sc,inc)*3 (12)
Rnd 7. 12 sc
Rnd 8. (2sc,inc)*4 (16)
Rnd 9. 16 sc
Rnd 10. (3sc,inc)*4 (20)
Rnd 11. 20 sc
Rnd 12. (9sc,inc)*2 (22)
Rnd 13. 22 sc
Rnd 14. (10sc,inc)*2 (24)
Rnd 15. 24 sc
Rnd 16. (11sc,inc)*2 (26)
Rnd 17. 26 sc
Rnd 18. (12sc,inc)*2 (28)
Rnd 19. 28 sc
Rnd 20. (13sc,inc)*2 (30)
Rnd 21. 7 sc, 5 ch st, skip 5 st, 5 sc, 5 ch st, skip 5 st, 7 sc, inc (31)
Rnd 22. 31 sc
Rnd 23. 30 sc, inc (32)
Rnd 24. 31 sc, inc (33)
Rnd 25. 31 sc, 2 slst.
Cut the yarn, hide the ends.
That’s it, the crocheted teddy bear is ready!
If you can’t do the assembly part, you can do it by watching the designer’s youtube channel.

Leave a Comment