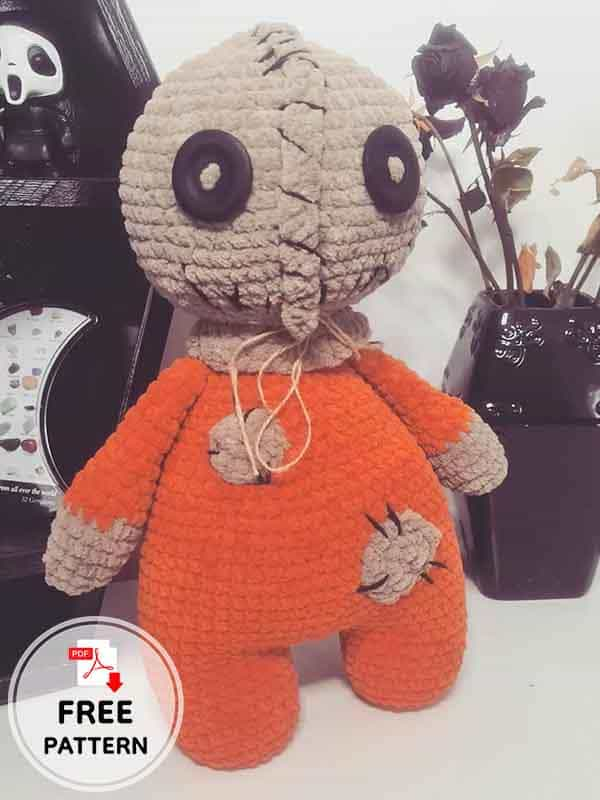
On a beautiful Sunday, I continue with you with halloween crochet patterns. Of course, when you say Halloween, the first character that comes to mind is crochet sam trick r treat. With its burlap head and orange patched pajamas, it looks scary and cute. You will have a lot of fun while embroidering its big button eyes and scary mouth. You can give this crochet sam trick r treat toy to your children on Halloween this year. I shared crochet sam trick r treat the previous year and we did not break the tradition this year. Of course, we have the best Halloween crochet doll patterns and you can browse them on our website. I wish you all a happy Halloween.
Design by: chrissyspookycrochet
Crochet Sam Trick r Treat
Materials and tools:
• Alize velluto 530 beige (1 skein)
• Alize velluto 6 orange (1/2 skeins)
• Some craft ribbon
• Thin black yarn for details
• 4.0mm black buttons
• 6mm crochet hook
• He is going to be about 38 cm.
Abbreviations:
M: Stitch
Sc: Single crochet
MR: Magic ring
Ch: Chain
Dc: Double crochet
Hdc: Half double crochet
Ss: Slip stitch
Inc: Increase
Dec: Decrease
FLO: Front loop only
BLO: Back loop only
Head
In alize velluto 530 beige:
1. MR with 6 sc (6)
2. in each stitch, inc x6 (12)
3. 1sc, 1 inc x6 (18)
4. 2sc, 1 inc x6 (24)
5. 3sc, 1 inc x6 (30)
6. 4sc, 1 inc x6 (36)
7. 5sc, 1 inc x6 (42)
8. 6sc, 1 inc x6 (48)
9. 7sc, 1 inc x6 (54)
10-19. 1 sc in each stitch (10 rounds) (54)
20. 7sc, 1 dec x6 (48)
21. 6sc, 1 dec x6 (42)
22. 5sc, 1 dec x6 (36)
23. 4sc, 1 dec x6 (30)
24. 3sc, 1 dec x6 (24)
Start stuffing the head then gradually fill further.
25. in each stitch, work 1 sc in FLO (24)
26. in each stitch, 1 sc (24)
27. 1 sc, 1 hdc, 1 dc, repeat around (fasten off with 1 sc) cut the thread (24)
28. Go back two rows, where we left the BLO stitches, then work 1 sc in each sc (24)
29. 2 sc, 1 dec x6 (18)
30. Stuff the head
Cut the thread leaving it long – we’ll, need it for sewing.
Attach the eyes around round 12 about 8 stitches apart, embroider the mouth using thin black yarn, intentionally messy.
Head detail:
1. Make a slipknot with about 45 ch (adjust based on your stitch size and how much you’ve stuffed the head- measure to cover the entire head).
2. I additional ch to turn, then turn the piece and work 1 sc in each stitch sew it onto the head, use thin black yarn to make coarse stitches, messiness is fine here too. Thank you for choosing amigurumicat.com.
Wrap the craft ribbon around the protruding piece and make a bow.
Legs + body
In alize velluto 3 orange:
1. MR with 6 sc (6)
2. inc x6 (12)
3. 1sc, 1 inc x6 (18)
4. 2sc, 1 inc x6 (24)
5-9. 1 sc in each stitch (24)
Repeat this twice for the first one you can cut and leave a long tail, u can use it to sew holes.
For the second, leave the thread and crochet 4 ch.
Then insert the hook into the first leg and connect the two with a sc. Then work 1 sc in each stitch around, in the ch we also make 1 sc in each, on the other side too.
10-22. in each stitch, 1 sc (13 rounds) (56)
23. 4 sc, 1 dec around the round ends with 2 sc (47)
24-25. in each stitch, 1 sc (2 rounds) (47)
26. 3 sc, 1 dec around, the round ends with 2 sc (38)
Start stuffing the body, then gradually fill further.
27-28. in each stitch, 1 sc (2 rounds)(38)
29. 2 sc, 1 dec around (29)
30-31. in each stitch, 1 sc (2 rounds) (29)
32. 1 sc, 1 dec around (20)
33-34. in each stitch, 1 sc (2 rounds) (20)
Cut the thread and weave in.
Arms
Start with alize velluto 530 beige:
1. MR with 6 sc (6)
2. inc x6 (12)
3. 3 sc, 1 inc x6 (15)
4-6. in each stitch, 1 sc (3 rounds) (15)
7. Switch color to alize velluto 3 orange, then work 1 sc in each stitch.
8. 3 sc, 1 dec x3 (12)
9-14. in each stitch, 1 sc (6 rounds) (12)
15. 2 sc, 1 dec x3 (9)
16-19. in each stitch, 1 sc (4 rounds) (9)
Lightly stuff the front of the arm, then sew it closed.
Sew the arms to the body on round 33.
Patches
1. MR with 6 sc (6)
2. in each stitch, inc (12)
3. 1 sc, 1 ch around (18)
For the second patch, omit the 3rd round. These will be sewn onto the body.
Then use thin black yarn to make coarse messy stitches.
Then sew the arms onto the body, and finally attach the head. Before completely sewing the head, if you have a few stitches left, stuff the area between the head and body a bit more.
Your own scarecrow slasher is ready!


Leave a Comment