
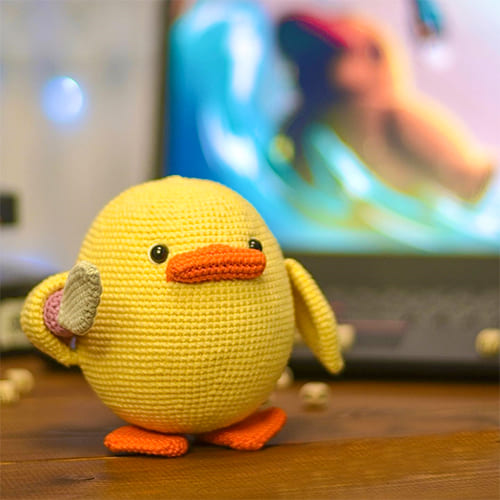
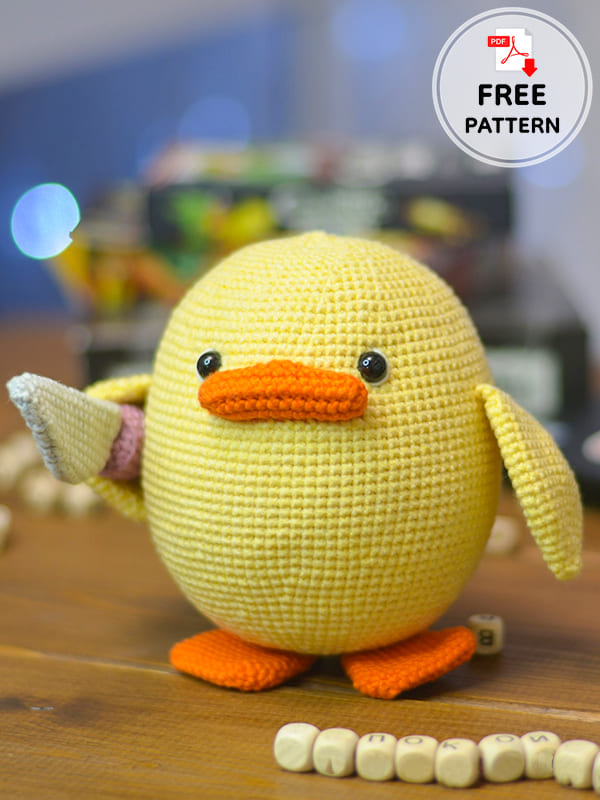
To make a cute crochet duck, follow our free amigurumi pattern instruction step-by-step and complete this gorgeous cute duck. The finished size of the toy will be 11 cm when the specified materials are used. If you want to use a plush yarn, change the size of your crochet hook accordingly. At the same time, your toy will increase in size. The cute duck has a knife in his hand. Thanks to its angry appearance, it will be a very funny and entertaining amigurumi toy. Follow and complete the free crochet duck pattern instruction right now. Do not forget to send us a photo after completing the duck. I love you all, happy weekend!
Angry Duck PDF Amigurumi Crochet Free Pattern
Designer: yuka_brin
Materials:
✓ Eyes on a secure mount 8 mm, 2 pcs
✓ YarnArt Jeans #88 – main light yellow, #65 – pink for knife handles, #46 – gray for knife blade; Gazzal Baby Cotton #3419 – orange color for legs and beak. And any white thread to embroider near the eye
✓ Filler
✓ Hook #1.75-2.0 (I have Clover #2)
✓ Sewing needle
• The finished size of the toy is about 11 cm.
Abbreviations:
MR: Magic ring
Ch: Chain
BLO: Back loop only
Inc: Increase
Dec: Decrease
Sc: Single crochet
Hdc: Half double crochet
Dc: Double crochet
Body:
In yellow.
1. 7 sc in MR (7)
2. 7 inc (14)
3. (1 sc, inc)*7 (21)
4. 1 sc, inc, (2 sc, inc)*6, 1 sc (28)
5. (3 sc, inc)*7 (35)
6. 2 sc, inc, (4 sc, inc)*6, 2 sc (42)
7. (5 sc, inc)*7 (49)
8. 3 sc, inc, (6 sc, inc)*6, 3 sc (56)
9. (7 sc, inc)*7 (63)
10. 4 sc, inc, (8 sc, inc)*6, 4 sc (70)
11. (9 sc, inc)*7 (77)
12. 5 sc, inc, (10 sc, inc)*6, 5 sc (84)
13. 84 sc (84)
14. (13 sc, inc)*6 (90)
15. 90 sc (90)
16. 7 sc, inc, (14 sc, inc)*5, 7 sc (96)
17-33. 96 sc (17 rows of 96 sc)
Between 33 and 34 next, insert / fasten the eyes later. The distance between the eyes is 19 sc.
In the process of crocheting, we begin to stuff the body.
34. 7 sc, dec, (14 sc, dec)*5, 7 sc (90)
35. 90 sc (90)
36. (13 sc, dec)*6 (84)
37. 84 sc (84)
38. 6 sc, dec, (12 sc, dec)*5, 6 sc (78)
39. 78 sc (78)
40. (11 sc, dec)*6 (72)
41. 5 sc, dec, (10 sc, dec)*5, 5 sc (66)
42. (9 sc, dec)*6 (60)
43. 4 sc, dec, (8 sc, dec)*5, 4 sc (54)
44. (7 sc, dec)*6 (48)
45. 3 sc, dec, (6 sc, dec)*5, 3 sc (42)
46. (5 sc, dec)*6 (36)
47. 2 sc, dec, (4 sc, dec)*5, 2 sc (30)
48. (3 sc, dec)*6 (24)
49. 1 sc, dec, (2 sc, dec)*5, 1 sc (18)
50. (1 sc, dec)*6 (12)
51. 6 dec (6)
We stuff the toy tightly, close the hole, cut the thread and hide it. The body is ready.
Wing (2 pcs):
In yellow.
1. 6 sc in MR (6)
2. 6 sc (6)
3. 6 inc (12)
4. 12 sc (12)
5. (1 sc, inc)*6 (18)
6. 18 sc (18)
7. 1 sc, inc (2 sc, inc)*5, 1 sc (24)
8. 24 sc (24)
9. (3 sc, inc)*6 (30)
10-18. 30 sc (9 rows of 30 sc)
19. (3 sc, dec)*6 (24)
20. 24 sc (24)
21. Fold the part in half, crochet through 12 sc (12)
We do not fill the wing. Leave a long thread for sewing.
We arrange the wing so that one corner is between 29 and 30 rows, the second between 25 and 26, then sew.
Tail:
In yellow.
1. 6 sc in MR (6)
2. 6 sc (6)
3. 6 inc (12)
4. 12 sc (12)
5. (1 sc, inc)*6 (18)
6. 18 sc (18)
7. 1 sc, inc (2 sc, inc)*6, 1 sc (24)
8. Fold the part in half, knit 12 sc (12)
We do not stuff the tail. Leave a long thread for sewing. Sew to the body between 12 and 13 side by side.
Paws (2 pcs):
In orange.
We make a chain of 10 ch.
1. With 2 ch from the hook – 8 sc, inc from 3 sc, continue the row on the reverse side of the chain from ch – 7 sc, inc (20)
2. inc, 7 sc, inc*3, 7 sc, inc*2 (26)
3. 26 sc (26)
4. 26 sc (26)
5. (11 sc, dec)*2 (24)
6. 24 sc (24)
7. (10 sc, dec)*2 (22)
8. 22 sc (22)
9. (9 sc, dec)*2 (20)
10. 20 sc (20)
11. (8 sc, dec)*2 (18)
12. 18 sc (18)
13. (1 sc, dec)*6 (12)
14. 12 sc (12)
15. 6 dec (6)
We do not stuff the paw. We close the hole, cut the thread and hide it. Sew to the “bottom” duckling.
Beak:
In orange.
We make a chain of 15 ch.
1. With 2 ch from the hook – 13 sc, inc from 3 sc, continue the row on the reverse side of the chain from ch – 12 sc, inc (30)
2. 30 sc (30)
3. 20 sc, hdc, 2 dc, hdc, 6 sc (30)
Leave a long thread for sewing. We add a little filler to the beak during the sewing process. We sew the top of the beak between 33 and 34 rows. Bottom between 29 and 30 rows.
Knife blade:
In grey.
Leaving a long thread for sewing, we make a chain of 6 ch.
1. With 2 ch from the hook – 4 sc, inc from 3 sc, continue the row on the reverse side of the chain from ch – 3 sc, inc (12)
2. 12 sc (12)
3. 5 sc, inc from 3 sc, 6 sc (14)
4. 14 sc (14)
5. 6 sc, inc from 3 sc, 7 sc (16)
6. 16 sc (16)
7. 7 sc, inc from 3 sc, 8 sc (18)
8-12. 18 sc (5 rows)
13. 7 sc, dec from 3 sc, 8 sc (16)
14. 16 sc (16)
15. 6 sc, dec from 3 sc, 7 sc (14)
16. 14 sc (14)
17. 5 sc, dec from 3 sc, 6 sc (12)
18. 12 sc (12)
19. 4 sc, dec from 3 sc, 5 sc (10)
20. 5 dec (5)
We close the hole, cut the thread and hide.
Knife handle:
In pink.
1. 6 sc in MR (6)
2. 6 inc (12)
3. (1 sc, inc)*6 (18)
4. BLO: 18 sc (18)
5-8. 18 sc (4 rows)
9. BLO: 18 sc (18)
10-13. 18 sc (4 row)
14. BLO: 18 sc (18)
15-17. 18 sc (4 rows)
18. BLO: 18 sc (18)
19-22. 18 sc (4 rows)
23. BLO: (1, dec)*6 (12)
24. 6 dec (6)
We close the hole, cut the thread and hide it. We sew the blade to the handle.
Decor
After sewing on all the details, you can tighten the eyes and embroider for the eyes. In order for the duck to hold a knife in its paw, I sewed the tip of one of the wings to the body.
Happy crocheting! If you have any questions or comments, please write to me. I will be happy to help you!

Leave a Comment